SNEAKER • AIR JORDAN • AIR JORDAN 1
How To Spot FAKE Air Jordan 1 Mid in 2023 (All Colorways)

The most complete and up to date legit check guide for ALL Air Jordan 1 Mid Colorways in 2023. See comparisons between Real Vs Fake shoes.


"We're creating a reliable and up-to-date guide for authenticating sneakers, streetwear, and luxury items. Our team of experts use multiple references during the authentication process for the most accurate results."
- Dype Team
Here's How You Can Legit Check This Item
- •Rear View
- •Toe Box
- •Wing Logo
- •Swoosh Logo
- •Soles
- •Midsole Stitching
- •Tongue Label
- •Size Tag
- •Box Label
- •Shoe Tree
- •UV Light
Rear View
Let's begin by taking a look at the rear view of the Air Jordan 1 Mid. The main flaw we will examine between the authentic and replicas will be: [1] Hourglass Shape
Hourglass Shape
Take a look at the authentic Air Jordan 1 Mid, and you'll be able to see the iconic shape that the Jordan 1 is known for - the "Hourglass". This shape is most prominent on Air Jordan 1 Highs, however the Mids only mildly resemble this shape. The Mids will be a bit more bulky than the Highs and look more "rectangular".
NOTE: Some pairs will resemble an hourglass shape, while others will resemble a rectangle. Also keep in mind that the shape of the rear view will deteriorate as it's worn more and more, so it's more significant for "New" or "Like New" shoes. Since the shape is less prominent than on the Air Jordan 1 Highs, this indicator is also not as significant for the Mid.

We've taken the time to show and describe this property for you in the authentic Air Jordan 1 Mid and the replica. Depending on the Jordan 1 release, the overall rear view shape should either maintain a slight Hourglass or a Rectangular Shape. The rear view have different sections, in which we'll call [1] Upper [2] Center [3] Lower
NOTE: The upper section should never have a slimmer width than the center or lower section. If this is the case, like in the top image, it is most likely fake.
Rectangular Shape
Denoted by the uppermost dotted red line. The upper section should have a wider - and in some pairs - almost equal distance from the center and lower section. It should never be slimmer than the center or lower section of the Jordan 1 Mid. However, on the fake Jordan 1 Mid, you can clearly see that the upper section is more narrow than the center and lower.
Hourglass Shape
Here's an example of a Jordan 1 Mid with a stronger hourglass shape in the image below.

In this example, the fake Jordan 1 Mid from the shape of the rear view isn't as flawed as the previous example. Top-tier counterfeits will usually get the shape correct, similar to in this example, where the shape is comparable to some retails. Hence, we'll have to take a look at more indicators of authenticity.
Toe Box
Next, let's take a look at the toe box of the Jordan 1 Mid. We'll focus on: [1] Perforation Holes [2] Stitching [3] Shape
Air Jordan 1 Mid Milan (Ex: 1)

Shape
Denoted by the red dotted curve. The fake Jordan 1 Mid is far too narrow relative to the retail pair. On the authentic pairs, the toe box is much more flat towards the bottom, which makes the toe box wider as well.
Perforation Holes
The wider toe box on the authentic pair, enables the perforated holes to be spread much more sparse on the real pair. On the replica, you can see that the fake pair perforated holes are much larger and also more densely populated with less spacing between each hole.
Air Jordan 1 Mid SE Turf Orange (Ex: 2)

Stitching
Denoted by the blue outline. Notice how different the threads on the stitching look between the real and fake Jordan 1. The authentic toe box has much thicker threads in the stitching compared to the fake shoe. On the fake shoe, the threads are barely visible because of the depth in which it is sewn and also because of how thin the thread is.
Also notice the red arrow. The black furred outline has a small slight gap on the replica.
Jordan 1 Mid SE Grey Green (Ex: 3)

Perforation Holes
The perforated holes of the fake Jordan 1 is ever so slightly larger than on the retail pair. Minute differences such as this is usually only noticeable when compared side by side with a retail pair.
Wing Logo
Next, let's move onto the iconic Air Jordan Wing Logo on the side of the Air Jordan 1 Mid. The wing logo design will differ depending on the release of the Air Jordan 1 Mid. Hence, it is vital to compare the same releases, and not different releases. We'll focus on [1] "Air Jordan" Text [2] Logo Details [3] "TM" Text [4] Placement
We'll take a look at multiple examples...
Air Jordan 1 Mid Fearless Facetasm (Ex: 1)

"AIR JORDAN" Text
Denoted by the light blue outline. The replica text is slightly thicker than on the real shoe. Whereas the authentic is naturally much thinner. You can see this being more obvious on the letter "D" and "R".
Stitching
Denoted by the orange box. Notice how on the legit Jordan 1, the stitching follows along the perimeter of the wing logo, but never comes into contact with it. However, on the fake, the stitching is continually stitched right next to the wing logo without any spacing between them.
Placement
Denoted by the green outline. Also notice the position that the wing logo is placed in. The real wing logo is sloped upwards more than the fake pair. It is also smaller than the fake. You can see the distance between the wing logo and the edge of the panel being much greater on the replica than on the original.
Shape
Denoted by the yellow arrows. Take notice to the red patch material underneath the wing logo. The real pair is changes direction which makes the shape much more angular. However the fake Jordan 1 Mid has zero angularity to the red patch; instead it is rounded and curves throughout the entire shape.
Air Jordan 1 Mid Turf Orange (Ex: 2)

"AIR JORDAN" Text
Denoted by the blue outline. The fake "AIR JORDAN" text is much too thick and bolded compared to the authentic. You can also notice the text font being more "bubbly" without angularity to the letters. You can see this being most prominent on the letter "N" on the replica.
"TM" Text
Denoted by the orange box. Notice the size difference in the font for the "TM" text between the retail and counterfeit. The "TM" text is much bigger on the retail shoe compared to the fake.
Logo Details
Denoted by the green box. Take notice of the shape of the pellets on the logo. The replica pair is formless and has no angularity to it, especially on the corners of the pellet. The real pair is angular near the corners. The fake also has too much spacing between each pellet, whereas the real one is much closer.
Air Jordan 1 Mid Red Chile (Ex: 3)

"AIR JORDAN" Text
Denoted by the red outline. The "AIR JORDAN" text is much thicker on the fake than on the retails. This difference in thickness is a common occurrence on counterfeits. The difference in thickness is most prominent on the letter "R".
Swoosh Logo
Next, let's move onto the swoosh logo on the Air Jordan 1 Mid. We'll focus on [1] Swoosh Shape [2] Swoosh Tip [3] Stitching
Air Jordan 1 Mid SE Fearless Chateau Rouge (Ex: 1)

Swoosh Tip
Denoted by the red circle. Notice how the fake Jordan 1 Mid swoosh tip is almost touching the corner stitching. However, on the authentic pair, the tip of the swoosh should never be that close, and it should have slight spacing.
Stitching
Denoted by the blue rectangle outline. Notice the color difference of the thread used in the stitching. Often times, counterfeits will compensate by using another shade of color when dealing with peculiar or uncommon colors. The fake is using a light brown colored thread, while the authentic one is darker and blends in completely with the swoosh color.
Air Jordan 1 Mid Milan (Ex: 2)

Swoosh Tip
Denoted by the red circle. Notice how the fake Jordan 1 Mid swoosh tip is too close to the corner stitching once again. However, on the authentic pair, the tip of the swoosh is has a comfortable space gap.
Stitching
Denoted by the green rectangle box. Notice the stitching inconsistency on the replica pair. Every thread sewn in is a different length; you can see how from the bottom to top of the green rectangle, the stitch thread decreases in length. However on the authentic shoe, every thread is equal in length and throughout the entire swoosh as well.
Swoosh Shape
Denoted by the blue arrow. The fake swoosh slopes upwards abruptly without natural progression. However, on the real one, the curvature feels natural as it gradually curves upwards.
Midsole Stitching
Next, let's move onto the midsole of the Air Jordan 1 Mid. We'll focus on the stitching depth and consistency.
Air Jordan 1 Mid Milan (Ex: 1)

Stitching
The replica Jordan 1 Milan is inconsistent with the depth of the threads sewn into the stitching. Notice that the orange highlighted area, the stitches are sewn deeply where they're not very visible. However if you look towards the front area of the midsole, you can see that its back to being shallow.
The retail Jordan 1 is consistent throughout the entire midsole. All the threads are shallowly sewn into the midsole and are all visible.
Paint
Denoted by the red oval. Take a look at the sloppy paint job done on the soles of the sneaker. The pinkish/beige color of the soles are spilling over to the white midsoles, and you can see the smears and marks that overlap onto the white section.
Air Jordan 1 Mid SE Fearless Chateau Rouge (Ex: 2)

Stitching
Similar to example 1. The replica Jordan 1 is inconsistent with the depth of the threads sewn into the stitching. Notice that the orange highlighted area, the stitches are sewn deeply where they're not very visible. However if you look towards the front area of the midsole, you can see that its back to being shallow.
The retail Jordan 1 is consistent throughout the entire midsole. All the threads are shallowly sewn into the midsole and are all visible.
Soles
Next, let's take a look at the soles of the Air Jordan 1 Mid. We'll focus on [1] Nike Logo [2] Texture
Air Jordan 1 Mid Milan (Ex: 1)

Texture
Denoted by the green circle. The Jordan 1 Mid should always have a grainy and random texture to the outsoles of the shoe. However the replica has a geometric/patterned texture. You can see the "X" shaped markings on it.
Nike Logo
Denoted by the red circle. The "NIKE" logo is usually easily replicated and hard to distinguish, however the flaw on counterfeits usually stem from the "R" stamp. The fake has the "R" slightly bigger than the authentic shoe. In addition to it being bigger, it is also much too close to the letter "E" in "NIKE". There should be a moderate amount of spacing between the "NIKE" and "R" on the retails.
Air Jordan 1 Mid Chicago Black Toe (Ex: 2)

Texture
Denoted by the green circle. The same issue arises with the difference in texture. The real is grainy and random, while the replica is patterned.
Denoted by the red rectangle box. The fake has a sloppy texture within the details of the inside panel. However, if you take a look at the retail, it has a consistent pattern to it throughout the inside panel.
Tongue Label
Next, let's move onto the tongue label of the Jordan 1 Mid. The tongue label will have the Jumpman logo, unlike the Jordan 1 High, which has the Nike Swoosh logo. We'll focus on [1] Jumpman Logo [2] Stitching [3] Color
Air Jordan 1 Mid Chicago Black Toe (Ex: 1)

Jumpman Logo
Denoted by the green arrows. The fake Jordan 1 Mid is slightly grazed which leaves a crease between the Jumpman. This makes the Jumpman look like it has an "armpit" on the arm. This crease is also present on the belly of the Jumpman. The retail pairs should not have an "armpit" on the arm nor should it have these obvious creases.
Also take notice that the Jumpman on the replica is slightly shorter and more condensed relative to the retail. The real Jordan 1 should have a tall and more elongated logo.
Color
Denoted by the yellow outline. The fake uses a lighter shade of red, which is too bright and vibrant. Keep in mind that your color perception will change depending on the lighting of the shoe. However in our case, the flaw is quite noticeable despite the small difference in lighting. The authentic uses a darker shade of red.
Stitching
Denoted by the blue rectangle box. Notice the length difference of each stitch in the stitching. The fake stitches are lengthier compared to the retail. The real tongue label should have short, precise, and consistent stitches throughout the sneaker.
Air Jordan 1 Mid Royal (Ex: 2)

"AIR" Text
Denoted by the green rectangle box. Notice that the fake tongue label is inconsistent with the size and thickness of the letters. On the replica, the letter "A" is much thinner than the other letters: "I" and "R". The retail should have consistent letter thickness in the entire word.
Size Tag
Next, let's move onto the size tag label on the Air Jordan 1 Mid. You'll be able to find this either on the back of the tongue or the inner walls of the sneaker. We'll focus on [1] Font Size [2] Font Spacing
Air Jordan 1 Mid Chicago Black Toe (Ex: 1)

Font Size
Denoted by the red box. The fake Jordan 1 Mid is clearly using a much smaller font than on the retails for this code.
Font Spacing
Denoted by the green outline. On the replica, notice that the text of the sizes and countries are much smaller and also bolded. The authentic tag should be thinner and a larger font. Also notice the "CN 265(2.5)" on the fake has inconsistent spacing between each letter - notably on the "265" and "(2.5).
Denoted by the blue rectangle box. On the fake, you can see that the text on the bottom is completely cut off. Retails should have this text visible and readable.
Air Jordan 1 Mid SE Turf Orange (Ex: 2)

Font Size
Denoted by the red box. The fake Jordan 1 Mid is clearly using a much smaller font than on the retails for this code. We see similar issues arise on this example as well.
Font Spacing
Denoted by the green outline. On the replica, notice that the text of the sizes and countries are much smaller and also bolded. The authentic tag should be thinner and a larger font. In addition to this, the country and the sizes are too far spaced from each other. The real pair should have the size and countries closer together.
Denoted by the blue rectangle box. On the fake, you can see that the text on the bottom is completely cut off. Retails should have this text visible and readable.
Box Label
Next, let's move onto the box label of the Jordan 1 Mid. We'll focus on [1] Font Thickness [3] Color [4] Inconsistencies
Air Jordan 1 Mid SE Fearless Chateau Rouge (Ex: 1)

Color
Denoted by the red box. Notice the fake Jordan 1 Mid Fearless has a darker golden/brown color to the Jumpman logo. The original should be a beige/pinkish color tone. Also, the Jumpman on the fake is much more elongated and tall compared to the retail.
Denoted by the blue box. You see this same color flaw in the text "JORDAN.COM". The retail is a beige/pinkish color, while the replica is golden brown.
Inconsistencies
Denoted by the green outline box. This is one of the easier call out. The name and the color way of the sneakers displayed are completely different. The originals will show "AIR JORDAN 1 MID SE FRLS EMEA", not "AIR JORDAN 1 MID FEARLESS".
Font Thickness
Denoted by the orange box. Notice on the replica, the size 8.5 is drastically bolder than the retail. The real Jordan 1 Chateau will have a slim/mild thickness.
Denoted by the yellow box. The fake box label barcode is much bigger than the original box label. The barcode font is a common flaw amongst counterfeits.
Air Jordan 1 Mid Chicago Black Toe (Ex: 2)

Color
Denoted by the red box. Similar to example 1, notice the fake Jordan 1 has a darker golden/brown color to the Jumpman logo. The original should be a beige/pinkish color tone. Also, the Jumpman on the fake is much more elongated and tall compared to the retail.
Denoted by the blue box. You see this same color flaw in the text "JORDAN.COM". The retail is a beige/pinkish color, while the replica is golden brown.
Font Thickness
Denoted by the green outline box. Notice the fake box label, the text is much larger and taking up too much space on the label compared to the retails. The authentic will have this section of text quite small.
Denoted by the orange box. This isn't noticeable at first, but notice the number "5" on the fake is much bigger compared to the retail. You can see this being more obvious if you compare it relative to the size of the number "8". The authentic "5" is half (50%) the size of the "8", whereas on the fake, the number "5" is 75% the size of the number "8".
Shoe Tree
Next, we'll take a look at the cardboard shoe tree inside the Air Jordan 1s. This is for deadstock or new condition pairs, where maybe you'd still have it laying around. The shoe tree used inside authentic Air Jordan 1s are usually all identical.
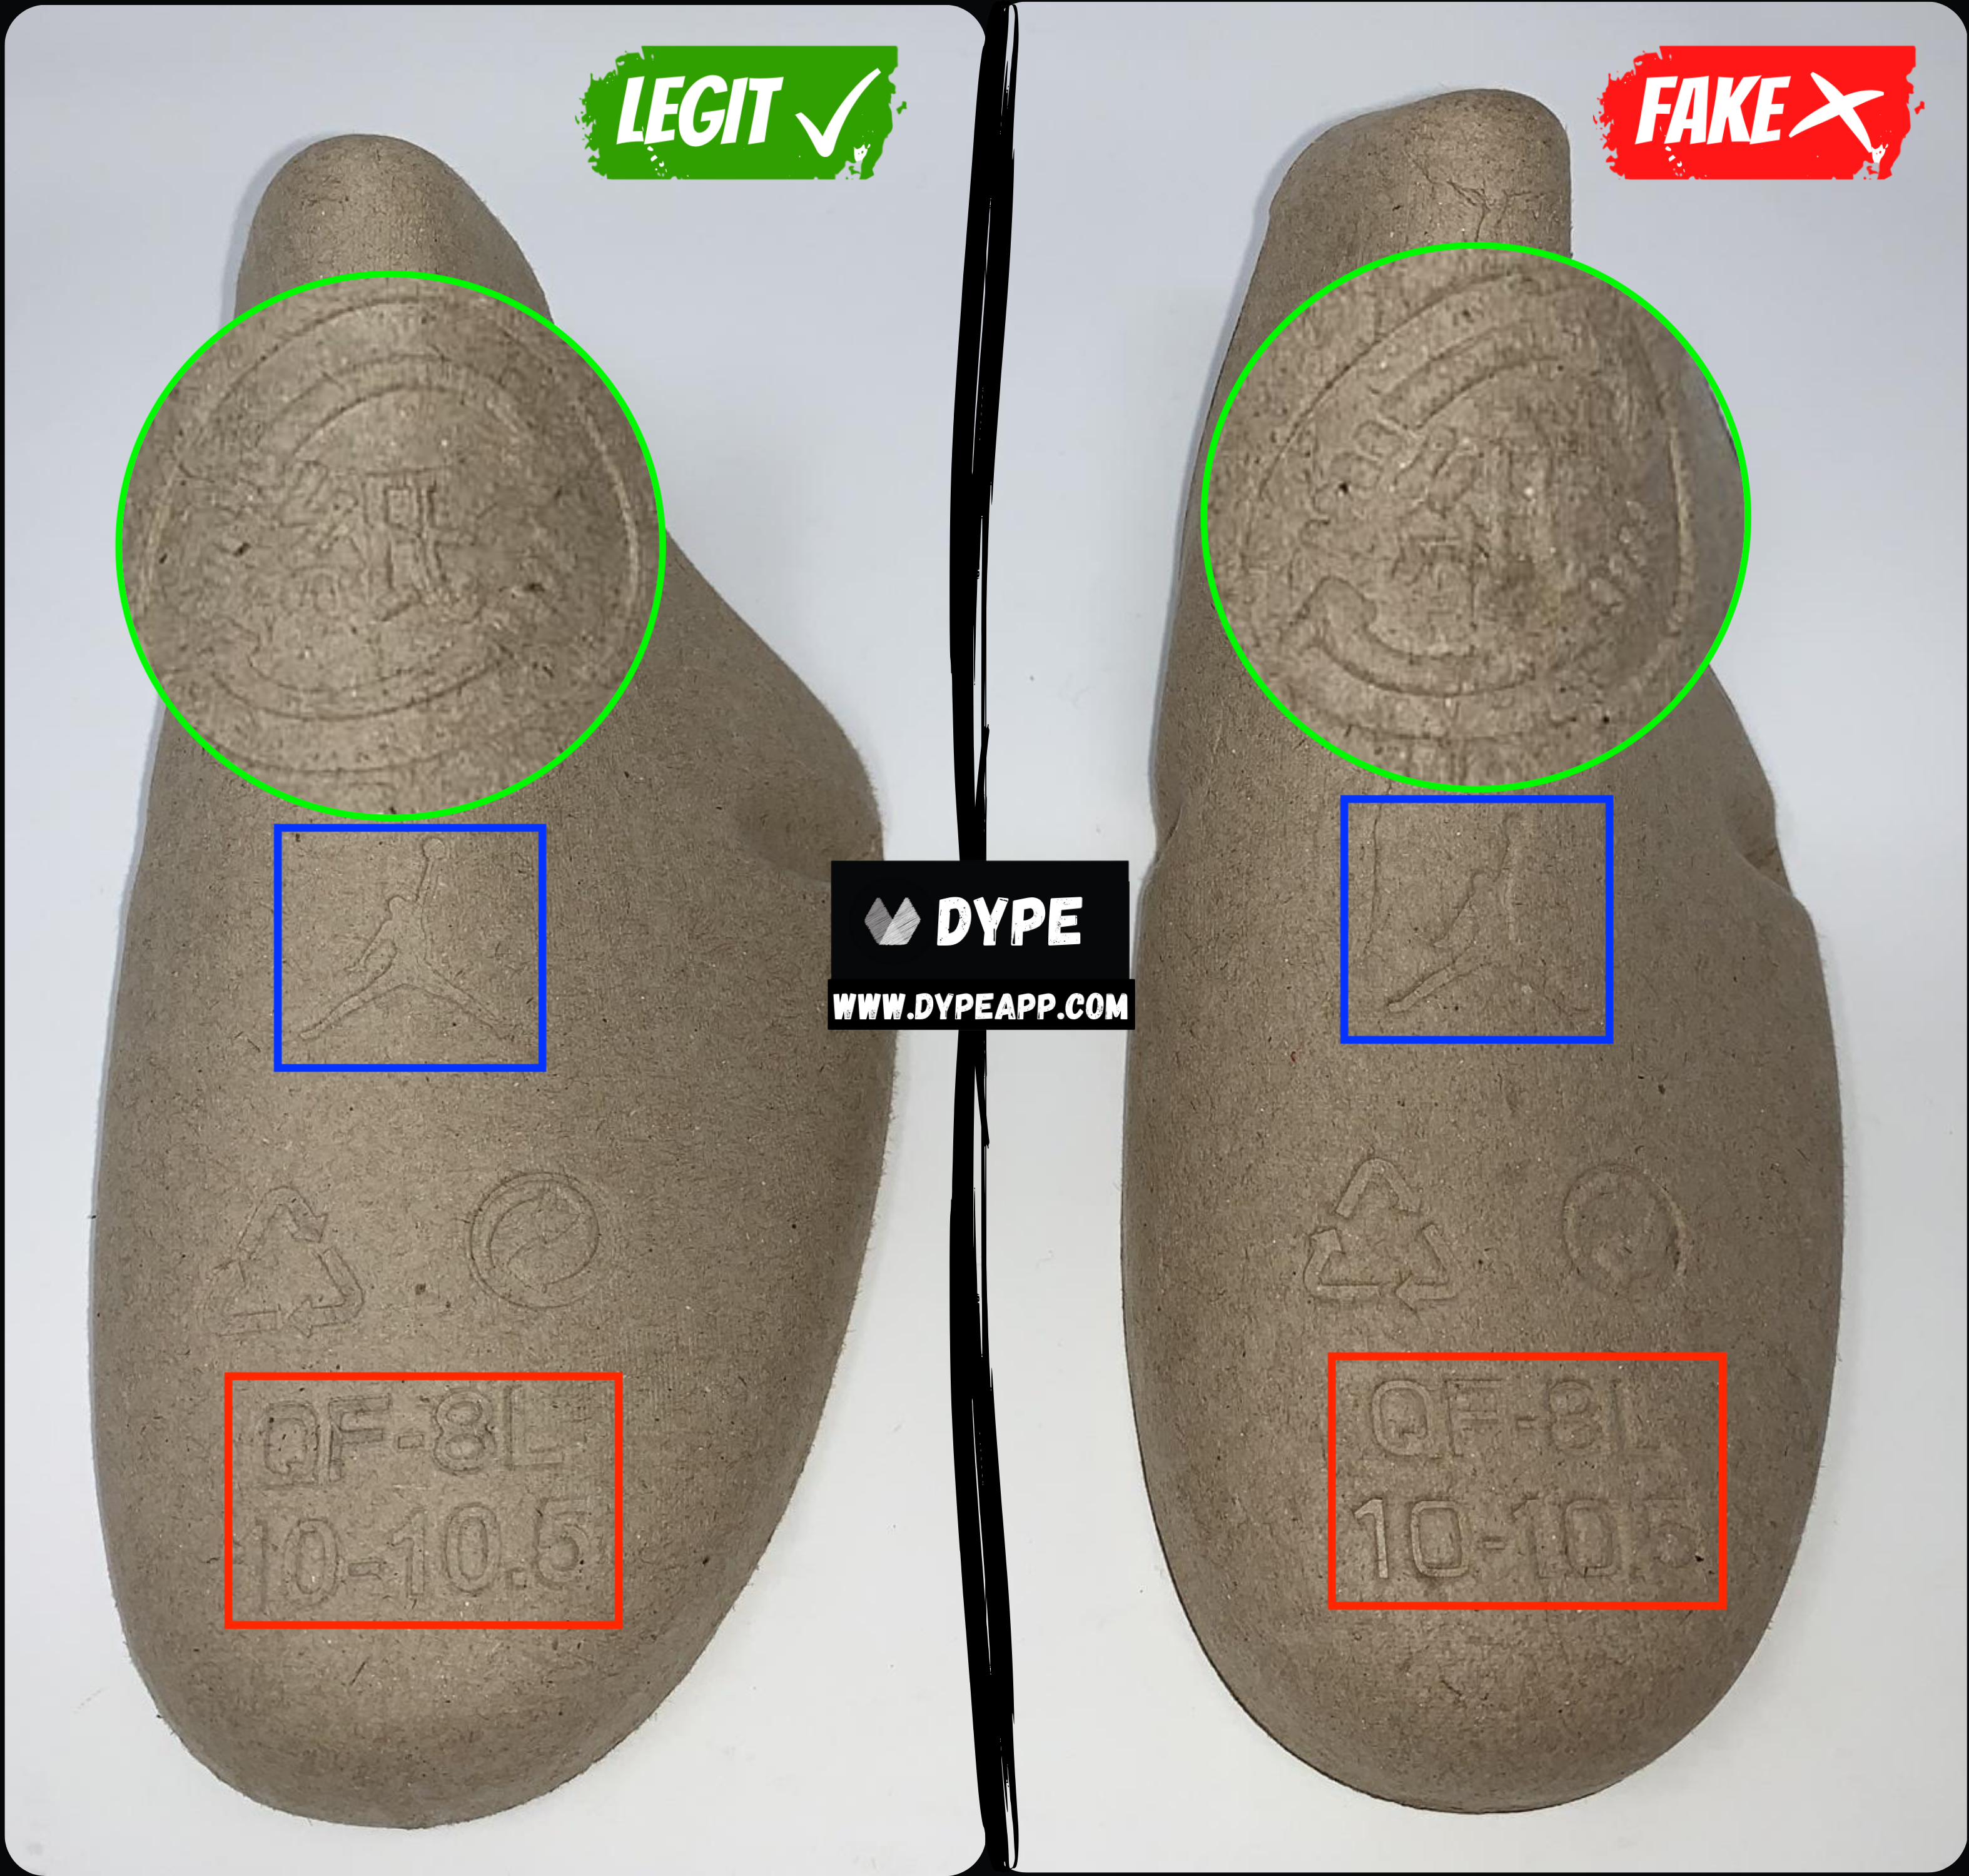
The first obvious flaw we can point out is the difference in the width of the shoe tree on the authentic and the replica. The authentic one is clearly wider, whereas the fakes are more narrow.
Denoted by the green circle. We can see on the legit shoe tree that the imprint made on the cardboard is completely different than on the fakes.
Denoted by the blue box. The Air Jordan logo imprinted on the legit shoe tree is much sharper and also thinner than the replica imprint.
Denoted by the red box. You can notice the difference in the font being used on the retail versus the fake. The legit one has a thicker font. It's more prominent in the differences if you look at the number "0". The authentic one is round and circular, while the fake is angular and boxy. This can also be said for the other letters.
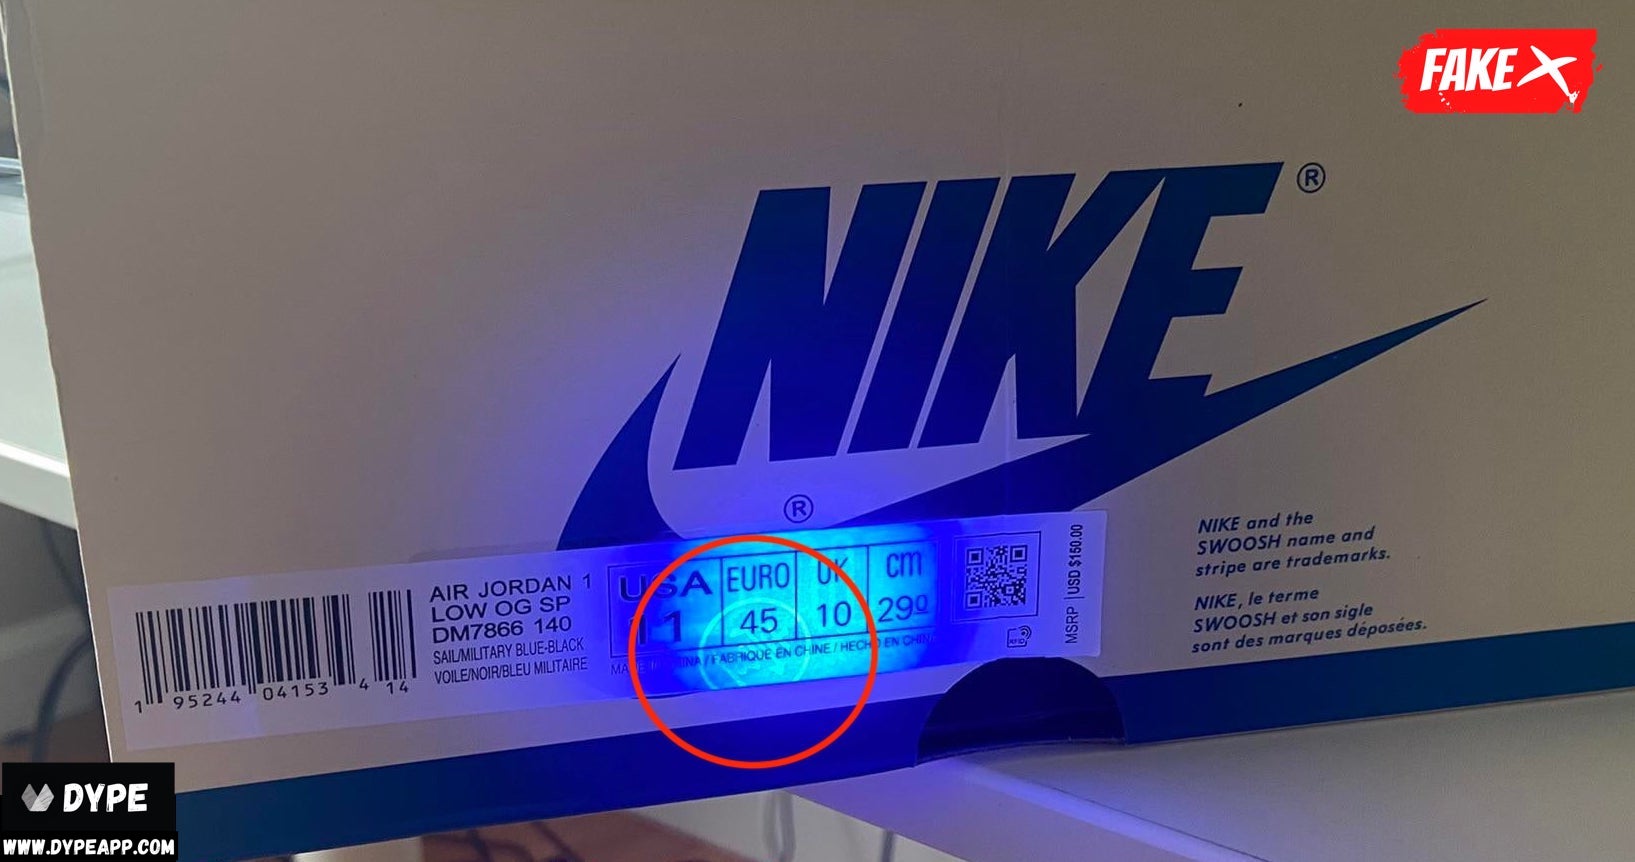
UV Light
Finally, to tie it all up. This final step is optional only for people who have a UV light source. Turn off all external lights, and shine your UV light on the Air Jordan 1 Mid and the box itself. Your goal is to look for any marks, stamps, or liquid/glue stains.
NOTE: Some very bad quality retail Air Jordan 1s will have noticeable glue stains at times. However, stamps/marks should NEVER be on the authentic pairs.
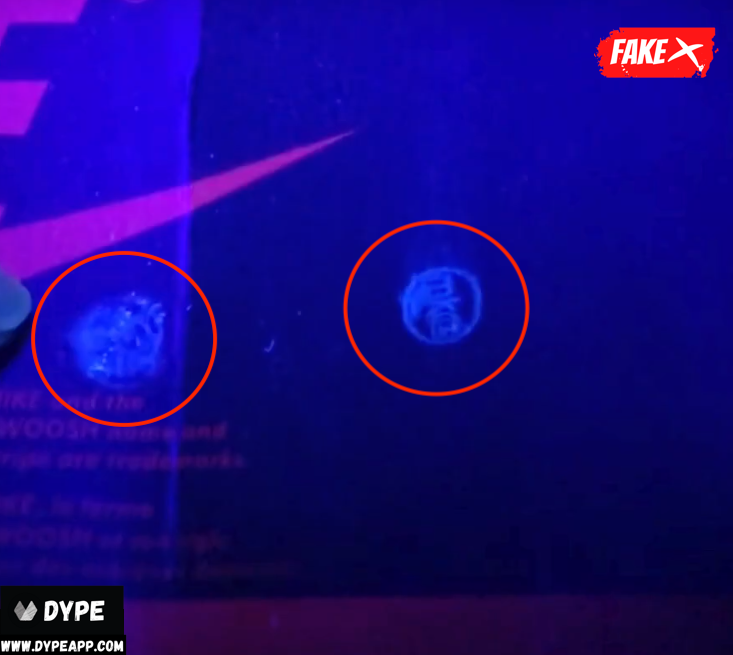
Above are some examples and indicators you're trying to look for. Authentic Air Jordan 1s should be completely mark or stamp free on the shoe itself and the box as well.
The marks shown in the above images are stamps from counterfeit manufacturers.